Showing posts with label Basement. Show all posts

Friday, March 4, 2016

This and That

My basement office space is finished.  

Just a reminder of what it was like before.

I was going to get rid of the black table, but then we realized we had enough space to create an L-shaped desk that will provide more space when some additional work equipment arrives.  It was white before and I painted it black to match the new cabinets.  What he uses as a desk is actually a sofa table, but it's functional as a desk and fits the room.

I also painted the bulletin board that hold's my husband's calendar and sweet notes from our daughter.  I added a new light since the old one (below) wasn't exactly effective.  

I will also paint the wicker trunk beneath the desk, but spray paint is easiest and it isn't warm enough for that currently.  I've asked Tom to get rid of it, but he refuses so I'll just do what I can to blend it in a little.

This light now serves to greet at our entryway.  I love my little clock that my father gave me.  He used a piece of electrical tape to stick a small wood block to the one side where the leg is missing.  It was so "him" to do something like that.  It's been 3 months today since we lost him.  Little things like this are reminders that make me remember him every day.

I also mentioned previously that I had to hem the new curtains for my bedroom.  I really like the way they hang now.  They completely change the feel of the room.

I've been pretty busy with the above and today I added the usual cleaning and laundry to the list.  Tomorrow, I head back to Delaware again to help mom continue packing up her house to sell.  There is an offer on the house but no decision yet on whether to accept it or not.  It will be my 4th weekend traveling and I'm looking forward to having a free weekend next week.  This girl could use a break.

Happy Friday!

Wednesday, March 2, 2016

The Basement Mess

So, my house isn't perfect.  I have kids and a husband.  It's hard to keep up with them sometimes.  There are spaces in my house I don't frequent and this is one of them.  This is what happens ...

Eventually, I get tired of it being this way.  So, what to do?  I decided that since my husband works from home here, I would fix up the space and make it more masculine for him.  He was apprehensive about my project and thought it was just fine the way it was, but once I got started he came around.

I purchased the two large bookcases to the left at Ikea.  They are Billy bookcases with Oxberg doors.  The two shelves to the right were actually shelves from the first picture above that I painted.  I also got these great boxes on the smaller shelves to hold things like crayons and paints.

Here are the shelves before painting.

We have lots of books and they were stashed all over, so it's nice to have them in one spot now.  I added some vintage prints on the wall that I got a while back at a flea market.  One is of a steam engine and the other is a machine of some sort.  My husband and I are both engineers so it seemed appropriate.  

The doors below actually hide a lot of the mess the kids had.

Overall, I think the space is shaping up to be a much more organized area.

I like the look of the vintage items in the space.  I so often decorate with white or lighter colors and the black here is something different for me but it works.

I'm not quite finished with the actual desk, but the majority of the work is done and I'm so much happier with it.

Linking to 
And

Wednesday, May 23, 2012

Kid Clean Up

I'm starting to realize that with kids it's inevitable that their rooms will evololve over time.  A room with merely a basic cribs and changing table ...

... became a big girl room. 
I thought I would be done for a while, but not quite.  Babies have a lot of "stuff" like swings, bouncers, jumparoos, etc.  I was glad to be rid of these things and to lose the changing table, but those seem to have been replaced with lots of toys.  We try to buy more books than toys but somehow they just accumulate between grandparents and holidays. 

Up until this point, we managed to store it all reasonably well in 3 places. Our basement which rarely looked like this anymore was one place.  I'll spare you the frightening reality it had become but the shelves were empty on daily basis and the contents where strewn everywhere.

We kept a few things in a basket in our living room.  Again, the basket was so full it barely fit under the table and it was typically emptied daily with the contents scattered everywhere.

This was a not-so-bad area. 

And this ...

The first thing I did was to go through the toys for a long overdue trashing of broken or useless toys and donated toys that were perfectly good but the kids had outgrown or lost interest in.  Next, I decided that it was time to put more of these things in the kids' rooms and less all over the house.  They aren't babies anymore and they like to play in their rooms.  The room above is pretty small and probably better suited to a twin sized bed, but we've got what we've got so I had to work with it and find a way to make the room flow reasonably well without constantly having to trip over things that had no home.

This is how the bedroom ended up. 
Most of what is here was in the basement and the blue bins have plenty of space to store things. The trunk is filled with dress-up clothes. These shelves aren't anything fancy, but they're inexpensive and, well, they work great for storing toys.

I can't remember where I saw this idea but these are actually planters with the liners removed and painted white.

Nothing changed on the other side of the room, but here's a view looking that way.  I just noticed that a certain someone added a Mickey embellishment to the bed.

I'm still working on rearranging the basement and Zoe's room but this has already made a huge difference.
To be continued ...

Tuesday, November 30, 2010

Christmas Mantel

I just finished decorating my mantel for Christmas and thought I'd share it. 

Mercury glass candles ... I didn't have the easiest time finding mercury glass this year so this was a challenge to pull together.

I picked up this print of Notre Dame in Paris.  They have these all over for tourists (like me) who like worthless things that are probably made in China.  I love anyway.  Love my glittery birds too.  

Tree number two ...

I'm thinking about doing three trees next year and moving my new white tree to my dining room.  I think it would make the house look magical.  Just don't tell my husband.  He isn't always as enthusiastic about my brilliant ideas as I am.  

Linking to the Mantel Party on The Lettered Cottage.
P.S.  Sorry the pics aren't so sharp.  Black hole basement + non-fancy-pants camera + lack of photography skills = not so hot pictures.

Wednesday, November 10, 2010

Whitewashing Brick

I painted my fireplace a year ago and since then, I've received several questions about how I did it.  I've intended to do this for a while, but tutorials can be a little time consuming so I'm sorry its taken so long but here it is.

Here's what I started with before we moved in.  The bricks look like they were recycled, but mostly they were still so dark and depressing and that's not the least bit appealing in a basement room. 

I hated the fireplace and mostly tried to just pretend it wasn't there.  I just thought that someday we'd just pay to reface it with stone, have it removed or something.  Then, one day I thought of all the days I drove home from work through a certain neighborhood admiring the old homes.  Some homes were brick and had been painted.  Some of the painted brick homes had weathered paint and, some looked like some kind of chalking had given an uneven white appearance to the brick like on the house below.  These houses were the ones I loved the most.

Inspirational lightbulb moment.
I loved this on the exterior of a house so why not on a brick fireplace wall?

Make no mistake.  I'm normally gung-ho for paint projects but I was truly afraid to do this.  In the house where I grew up, I watched my dad spend years stripping layers and layers of paint (red, white, blue) from a brick fireplace probably 1/4 of the size of mine so I knew that once I put a paint brush on that brick, it would be forever.  Ultimately, I decided that if it went wrong, I could just paint it all out completely and I could live with it because I'd rather have a stark white wall over the dark hole it was.  After I made peace with my decision, I went for it.

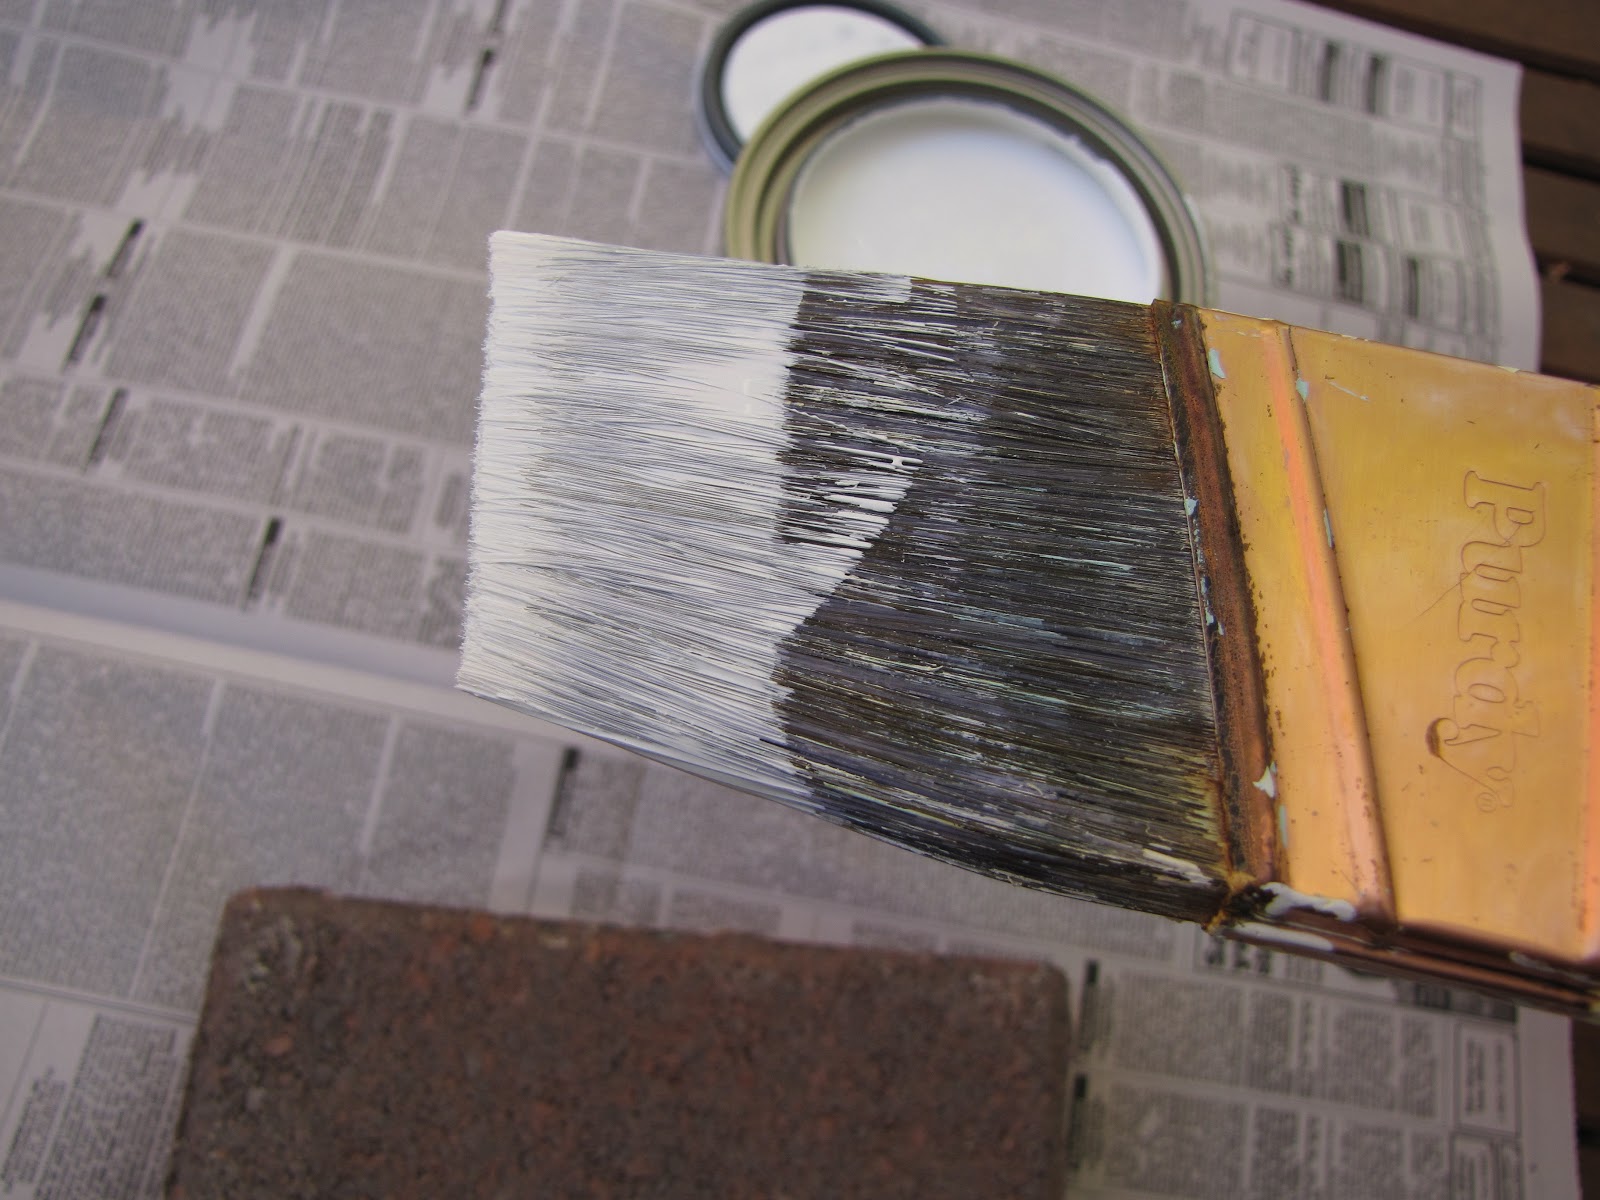
All I needed was semi-gloss white paint that I had on hand and a 2.5" brush.  I have an angled brush pictured below and it will do the job fine but if you have the square type, its probably better.  I did not paint the grout - Brick only. 

Now, on to the details (on sample bricks):
~ Don't put too much paint on the brush at one time.  I dipped the tip of the brush into the paint and wiped off a good portion of the excess. 

You do not want too much paint.  Starting out, I would suggest using less paint until you get the hang of it and find the right amount that works for you but keep in mind that less is more here.  Too much paint and you're going to end up with a solid white brick or a glob.  You can also come back later if you want to add more.  This is the perfect amount ...


~ Next, brush across the brick, without putting too much pressure so that you get semi-even paint across the brick but you aren't getting solid coverage. 

Then brush up and down blending out any brush strokes. 

Its okay if its uneven because randomness is what you're going for.  There is no exact science to this and it doesn't have to be perfect, but you also don't want it to be an obvious glob of paint or brush strokes.  Don't worry about perfection.

This part is important!
~ Step away from the wall every few bricks.
 Take a step away from the wall and see how it looks overall.  The appearance of your work is going to look different up close than it will standing away from it when you look at an entire section of bricks and your technique will change without your ever realizing it.  In the photo above, for example, there's what I think an obvious horizontal paint glob that I would blend more.  I didn't notice this standing so close.  When I worked on my wall, I found myself slowly adding more paint as I went across the wall and taking a step back helped keep things even.

This may sound scary and complicated.  It really isn't.  I actually think its easier than painting a solid wall because you aren't cutting in, doing trim or striving for perfection like when you paint a wall.  Its been a while since I did it but I think it took about 90 min. for me to do the entire wall. 

I know many people are anti-paint on brick and I completely understand that, but if you're like me and really hate it, its your house and you should make it something you love.  I hope this helps for anyone out there considering this project.

Thursday, April 8, 2010

A dark hole no more ...

So, my fireplace screen dried overnight and I put it back in place this morning.


What a diffrence to how it looked before ...


and an even bigger difference compared to the dark wall I started out with a year ago!

Wednesday, November 18, 2009

Its beginning to look a lot like Christmas ...

My pumpkin display ...

... has given way to this ...

I bought this little tree for next to nothing after Christmas last year. I was fed up with my kids pulling ornaments and needles off of our large tree and vowed to have only this tree this year. I didn't put the base on and I put it in this pot that I was using outside for Halloween. We aren't celebrating Thanksgiving at home, so I have no problem getting an early start on Christmas since we will most definitely be awaiting Santa's arrival at home.

So, a year later, I still want the big tree. We will probably get one. And, after chasing down little people with ornaments in hand for a few weeks, I will probably regret it but I suppose these things are all a part of having kids ... and celebrating holidays and family.

Monday, October 12, 2009

Mantle Improvements

Well, its going to be a while before I'm completely done, but here's the mantle I'm working with now ...

Here's what I started with when we moved in almost 6 years ago ...

We've since painted the wainscotting and walls and replaced the carpet. The fireplace was a dark hole, but I saw potential and who doesn't love a fireplace? The fact that it had an insert was a bonus. Did you know that fireplaces actually lose tons of heat? Inserts and wood stoves are much more efficient. We lived with it like this for a LONG time. Earlier this year, I lightly brushed the bricks with white paint. They look like recycled bricks, but I still wanted to lighten them up without painting them out completely. (I've mentioned this before, but the faux bricks on the upper left hide the electrical panel. It is what it is for the time being. Our electrical panel needs a complete overhaul sometime soon. Also, the gate is to keep little people from launching themselves from the step and reaching the hot insert. Its now also going to have a bonus purpose as a barrier to keep them away from my decor! I really can't wait to get rid of it though.)
So, in August, I found this great mantle at the flea market that had just come out of an old house in PA a few days earlier. It was far from perfect, but just what I was looking for. It was pretty filthy and I'd hate to see the house it came from, but with a lot of cleaning, I sent it off with my dad who worked incredibly hard to strip and paint it. He then brought it back and with the help of my mom, we managed to cut the opening to the perfect size of the insert.
And here we are now ...
Because there is a step of bricks, there's very limited space to put anything on top of the mantle. Also, since this is a basement and light is much sought after, a mirror would be great, but I may never find a mirror that fits the height and width proportion, so for the time being, the simple wreath is filling the space.

The pillar candleholders were a rustic brown color as was the box that holds the fatwood and they got a coat of white paint. You can see them unfinished in one of the pictures above. The mosaic silver vase, and white pillar were items I had.
The chandelier ... The area where its hanging was so empty. I had no idea what to do there. I nearly purchased a decorative metal panel, but I wondered if it would still seem empty 3-dimensionally. Then, I just remembered the chandelier. I've probably mentioned it before, but my parents bought it years ago and it was black. They wanted to get rid of it, but I took it instead. Its been in more than one of my homes and finally got painted white. I put it in the nursery for a while but it desperately needs a rewired plug so I took it out of there. My girls can't reach the wire here. I'm not sure about it, but at least its going to be functional. These picture are a little deceiving, but its so dark here usually. Its going to be fantastic when I can turn it on because my sewing area is to the right of the picture.

Mercury glass candleholders from HomeGoods. The votive holder was a wedding gift. (I've always loved the symbolism of this votive holder.)

Faux pumpkins ...

More faux pumpkins. The little gourds in the cornucopia are real. However, the ones sitting on the moss came in a bag from the $1 store. The lantern was something I purchased in Restoration Hardware 10 years ago when I was in Miami.

Feathers and faux roses purchased on sale from Michaels ...


Here's a funny little detail ... The mantle isn't connected to the wall! We had a little issue finding the right brackets but its a snug fit against the insert and it isn't going anywhere. Its on Mr. T's to-do list but after 5 years looking at it, I couldn't wait a second more to decorate it!

More makeovers on A Soft Place To Land hosting DIY Day!